As we’re encouraging all of our users to make the migration from Marketplace to Studio, we wanted give you some insight into how this will streamline your workflow
We have made the track uploading process more streamlined and catered toward your needs as a creator. Here are a few things that are new about it.
FILES & BASIC INFO
You'll still have the ability to upload multiple audio files for a track, just like in Marketplace. But now, rather than a top-down form to fill out, you easily just have a four-step process to follow. When uploading your files, simply drag and drop your files into the designated upload boxes, and you're all set. From there, you can add descriptions, photos, and even specify the track type.
We’ve added two new features: Review Submission feature. Now, at any point during the uploading process, you can easily review your track and the information you've entered. This gives you the flexibility to make any necessary changes before finalizing your upload.

Also, whenever you're ready to move on to the next step in the uploading process, your inputs and the tab’s title will light up in green. This visual cue lets you know you've successfully entered all the required information before proceeding.
When you’re ready to upload your music, you’ll complete four steps in total. First, is making sure you’re uploading all of your proper information and file types. Below is a comprehensive list of the files you’ll need to have ready to go.
Untagged .wav/.mp3 – An uncompressed audio file, meaning it retains the full quality of the original recording.
- Quality: This file is of much higher quality compared to an .mp3. It offers a clearer and more detailed sound.
- Usage: Ideal for final production and distribution because it maintains the integrity of your original sound. Buyers looking for the best quality will prefer .wav files.
- Export size: 16 bit to 32 bit; up to 48khz
- Trackout or Stems – Trackouts or stems refer to exporting each individual instrument and sound from your beat as separate files.
- Quality: These files are typically exported in .wav format to ensure the highest quality.
- Usage: Providing stems is important for artists, producers, and engineers who want to have complete control during the mixing process. They can adjust levels, add effects, and modify individual sounds to better fit their song. When someone asks for stems, you'll need to export each track (like drums, bass, melodies) individually and then zip them into one file for easy transfer. Offering trackouts or stems adds significant value to your tracks, potentially giving you a competitive edge and helping secure sales over others who don’t have them available.
- Export size: 16 bit to 32 bit .wav files; up to 48khz packaged in a zip file
- Tagged .mp3 file – a compressed audio file, which means the file has been processed to reduce its size, with an audio tag placed throughout the file.
- Quality: This is the lowest quality type of file, but it's still very common for sharing and previewing beats because the file size is small, making it easy to upload and download.
- Usage: Great for giving potential buyers a quick listen to your beat without taking up too much storage or bandwidth, while making sure that your beat is recognizable.
- PRO TIP: If you do not want to add your own tag to the .mp3, you can use the Beatstars custom voice tag feature on Studio, and we'll automatically tag your files for you.
- Export size: 128kpbs to 320kpbs
PRO TIP : When uploading your tracks, ensure that your cover art aligns with a consistent branding style. On BeatStars, you can take advantage of our Canva integration to easily design your artwork and import it directly into your upload. Simply click the "Edit artwork" button under the "Artwork Image" section, and from there, you'll be able to import any designs you've created in Canva.
Keep in mind when you’re creating, it’s important to maintain a cohesive theme across all your artwork so your audience can easily recognize your brand. This could mean using similar photo styles or color schemes, but avoid reusing the same image repeatedly. Find a balance between consistency and variety, and don’t hesitate to experiment with different designs until you find your brand identity.
METADATA
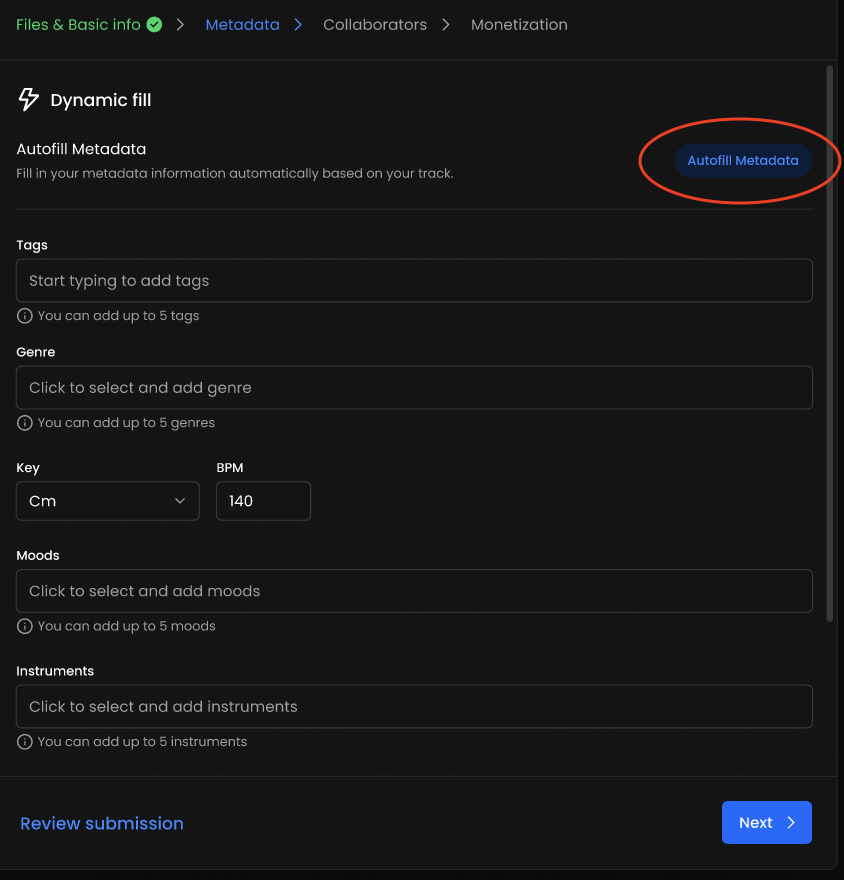
Once you have all the proper file types uploaded, you'll move on to your metadata. This step includes all the familiar fields from Marketplace, but with some upgrades. You'll be able to select the genre, and the key and BPM will be automatically updated once the track has been uploaded.
You can also define the mood your beat fits and list the instruments used. Providing this detailed information increases your track’s chances of standing out, as many artists filter their searches by mood or specific instruments.
Keep in mind that just because a tag may have a lot of search volume, doesn’t necessarily mean that’s the tag you should stick to. This section of your uploading is all about finding your niche tags that have longevity.
PRO TIP: Use Spotify to help you find relevant tags.
Step 1) Start by searching for the most popular artist whose style your beat resembles and use their name as a tag. For instance, you could use "Gunna" as the first tag.
Step 2) Next, scroll down to the “Fans Also Like” section. Identify an artist with a smaller following and use their name as another tag. In this example, we’ll use “Yung Nudy,” who has a smaller monthly listenership.
Step 3) Finally, explore the “Fans Also Like” section of the second artist to find another relevant artist for your third tag. For this example, "SahBabii" will be the third tag.
By following these steps, you not only tag a highly relevant and popular artist but also position yourself to invest early in the area of an artist who hasn't yet gained widespread recognition.
Here’s a time saver: use the new Autofill Metadata button in the top right corner to set up templated metadata entries, allowing you to upload everything instantly.

COLLABORATORS
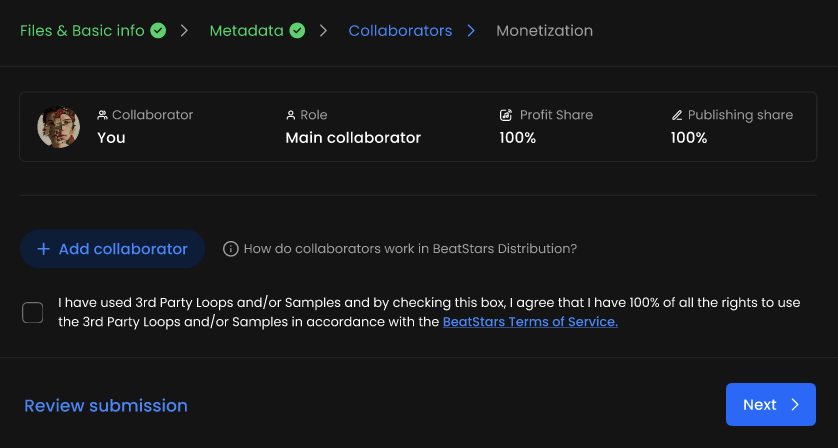
If you have collaborated with any other producers, you can easily manage the publishing and revenue splits here. Once the track is uploaded, it will automatically appear on both your profile and the profiles of any collaborators involved.

If you have received an invite for a collaboration, you can look at the top right corner of your Studio Dashboard, and click your notifications icon to see which tracks you have been invited to. If you don’t see a notification, you can directly visit the "Collabs" sections in your account and specifically filter for “Invitations” in the dropdown tab.
PRO TIP: The revenue split between you and your collaborators should be determined by the agreement reached among all parties involved. Typically, publishing is divided equally among the collaborators unless otherwise specified.
MONETIZATION
This is the tab to set your prices for each license type, from Basic to Exclusive, giving you full control over how your tracks are sold.
But before setting a price for your tracks, it's important to carefully evaluate several key factors. Consider the following questions to develop a strategy that works best for you:
- What is your end goal? Are you aiming for your first sale, trying to boost overall sales, or looking to increase your earnings per sale? Identifying your goal will help you focus on strategies that align with your objectives.
- Who is your ideal customer, and what budget do they typically have? Understanding your target audience will guide you in setting a price point. While a $10 difference between pricing a track at $30 versus $40 might seem small in the US, in other regions, this increase could be the deciding factor between a sale and losing out to a competitor.
- How frequently will you be uploading new tracks? Your upload schedule will influence your sales expectations, helping you gauge potential sales volume.
Once you have answers to these questions, you can choose one or more of the strategies below:
TIERED INDIVIDUAL PRICING
Great for:
- Catering to Different Budgets: By offering tracks at various price points, tiered pricing allows you to appeal to a wider range of buyers, from those looking for basic options to those seeking premium features or exclusivity.
- Maximizing Revenue Potential: Tiered pricing enables you to monetize different aspects of your work, such as higher-quality files or additional usage rights, ensuring you can capture more value from customers willing to pay for premium offerings.
Examples of tiered pricing:
- Basic License – $40
- Typically an MP3-only license with limited commercial uses
- MP3 & WAV leases – $50
- Typically comes with limited commercial usage rights for buyers
- WAV trackout leases – $150
- Gives buyers better file quality Typically comes with limited commercial usage for buyers
Unlimited lease – $250
- Comes with more commercial usage rights for buyers
- Offer Only
- For Exclusive rights, the buyer to make an offer for your track rather than selling your tracks exclusively for a fixed price
TIERED BULK PRICING
Great for:
- Increased Sales Volume: Bulk pricing can encourage buyers to purchase multiple beats at once, boosting overall sales. Because of the affordability of the tracks, you’re likely to attract repeat buyers.
- Increase Chances of Impulse Purchases: Creators often offer deals like “Buy 2, Get 1 Free,” which can enhance the perceived value of your offerings.
- Customer Loyalty: Offering discounts for bulk purchases can help build stronger customer relationships, leading to repeat business and long-term loyalty.
DISCOUNT PRICING
Great for:
- Increased Sales Volume: While this may result in lower revenue per sale, it can significantly boost overall sales volume.
- Example: Beast Inside Beats, a top seller on the platform, successfully uses a combination of discount pricing (as of August 2024, some .mp3 leases are priced as low as $7) and extensive bulk discounts.
- Creating Urgency: Limited-time discounts create a sense of urgency, prompting buyers to make quick purchasing decisions.
- Attracting New Customers: Discounts can make your beats more accessible, appealing to new customers who may be hesitant to pay full price
FREE DOWNLOADS
Great for:
- Attracting New Customers: Offering free downloads gives as many people as possible access to your beats at no cost.
- Obtaining Contact Information: On BeatStars, you can set your free downloads up as an exchange for emails, a follow on BeatStars, X or Soundcloud. This allows you to track potential customers and use this information to market more beats to them in the future.
- Additionally, any beats that you make available as a free download will also be available in Voloco, meaning thousands of more artists will have visibility to your beats and will have the option to purchase them within the marketplace.
CONTENT ID
As a Pro user, you can submit your tracks to Content ID, enabling them to be tracked across platforms like YouTube, Instagram, Facebook, and TikTok. If anyone uses your tracks without your permission as the copyright holder, you can file a claim. Additionally, your tracks will be included in sound libraries on Instagram, Facebook, and TikTok, allowing influencers and everyday users to feature your sounds in their content—entitling you to earn revenue from their use.
Pro Tip: Register your tracks through our Content ID platform during the uploading process—before they’re downloaded, purchased, or discovered by buyers. This helps you maintain control over your intellectual property (your tracks) and prevents others from claiming ownership first. Think of it like holding the keys to your own house: if you wait, someone else could try to claim ownership, leading to legal disputes later on.
Publish Track
Once you’ve reviewed all the details (by clicking the "Review Submission" button at the bottom left), your track will be live on your store.


